HTTP 통신에서
웹 브라우저는 사용자가 무언가를 요청(Request) 하면 서버는 데이터를 뿌려주는(Response) 방식으로 작동한다.
하지만 메신저의 경우는 사용자가 브라우저에 접속한 상태...
그렇다고 언제 대화를 주고 받을지 모르는 상태이다.
이 때 사용할 수 있는 게 WebSocket이다.
WebSocket - HTTP 환경에서 전이중 통신(full, duplex, 2-way communication)을 지원하기 위한 프로토콜
1) spring-websocket 라이브러리 추가
우선 라이브러리를 가져와야겠지?
pom.xml에 다음 과 같이 spring-websocket 라이브러리를 추가한다.
  <!-- Spring-websocket -->
  <dependency>
      <groupId>org.springframework</groupId>
      <artifactId>spring-websocket</artifactId>
      <version>${org.springframework-version}</version>
  </dependency>
+ json 라이브러리 추가
websocket은 json을 쓰기 때문에 json 라이브러리도 추가해준다
  <!-- json2 -->
  <dependency>
    <groupId>com.fasterxml.jackson.core</groupId>
    <artifactId>jackson-core</artifactId>
    <version>2.11.0</version>
  </dependency>

  <dependency>
    <groupId>com.fasterxml.jackson.core</groupId>
    <artifactId>jackson-databind</artifactId>
    <version>2.11.0</version>
  </dependency>

  <dependency>
    <groupId>com.fasterxml.jackson.core</groupId>
    <artifactId>jackson-annotations</artifactId>
    <version>2.11.0</version>
  </dependency>
2) servlet-context.xml에 매핑
servlet-context.xml에서 websocket namespace를 추가해준다.
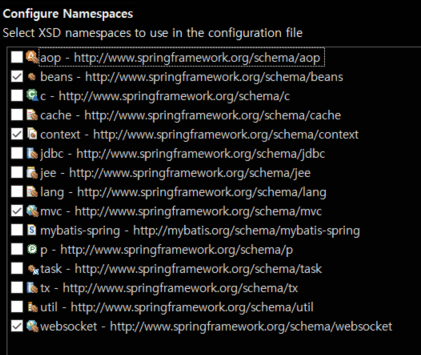
나는 기능을 분리하기 위해 appServlet폴더 안에 socketContext.xml을 만들었다.
servlet-context.xml에는 해당 값을 추가해줬고,
	<beans:import resource="socketContext.xml"/>

	<context:component-scan base-package="chat" />
socketContext.xml에 다음과 같이 추가해줬다. (servlet-context.xml과 마찬가지로 namespace추가)
	<websocket:handlers>
		<websocket:mapping handler="chatHandler" path="/chat-ws"/>
		<websocket:handshake-interceptors>
			<bean class="org.springframework.web.socket.server.support.HttpSessionHandshakeInterceptor"/>
		</websocket:handshake-interceptors>
	</websocket:handlers>
3) ChatHandler 클래스 만들기
ChatHandler클래스를 만들어주는데 반드시 TextWebSocketHandler를 상속시켜 만들어야 한다.
이 클래스는 WebSocket 다루는데 사용되어질 예정
*( 나는 자바 밑에 chat으로 패키지를 만들고, ChatHandler클래스를 만들었다.
마찬가지로 기능을 분리해주기 위해 )
package chat;

import java.util.*;

import org.springframework.stereotype.*;
import org.springframework.web.socket.*;
import org.springframework.web.socket.config.annotation.WebSocketConfigurer;
import org.springframework.web.socket.config.annotation.WebSocketHandlerRegistry;
import org.springframework.web.socket.handler.*;

// WebSocket을 사용하기 위해서는 반드시 TextWebSocketHandler를 상속해줘야 함

@Component
public class ChatHandler extends TextWebSocketHandler implements WebSocketConfigurer {

	private static List<WebSocketSession> list = new ArrayList<WebSocketSession>();

	// 사용자가 접속 했을 때 호출되는 메소드
	@Override
	public void afterConnectionEstablished(WebSocketSession session) throws Exception {
		System.out.println(" ### 사용자 접속 ");
		list.add(session);
	}

	// 사용자가 메세지를 보냈을 때 호출되는 메소드
	@Override
	protected void handleTextMessage(WebSocketSession session, TextMessage message) throws Exception {
		// 전송된 메세지를 List의 모든 세션에 전송
		String msg = message.getPayload();
		for(WebSocketSession s : list) {
			s.sendMessage(new TextMessage(session.getAcceptedProtocol() + msg));
		}
	}

	// 사용자 접속 해제했을 때 호출되는 메소드
	@Override
	public void afterConnectionClosed(WebSocketSession session, CloseStatus status) throws Exception {
		System.out.println(" ### 사용자 접속 해제");
		list.remove(session);
	}

	@Override
	public void registerWebSocketHandlers(WebSocketHandlerRegistry registry) {
		registry.addHandler(this, "/chat-ws").setAllowedOrigins("*");
	}


}
4) JSP를 만들어 작동시켜보자
<%@ page language="java" contentType="text/html; charset=UTF-8"
	pageEncoding="UTF-8"%>
<html>
<head>
<meta http-equiv="Content-Type" content="text/html; charset=UTF-8">
<title>Insert title here</title>
</head>
<body>
	<div>탕코딩님의 채팅방</div>
	<input type="hidden" id="id" value="탕코딩">
	<div>
		<div id="chatarea" style="width: 300px; height: 300px; border: 1px solid black;"></div>
		<input type="text" id="message" />
		<input type="button" id="send" value="보내기" />
		<input type="button" id="exit" value="나가기" />
	</div>
</body>
<script type="text/javascript">
	// ##### 입장~~~!!
	let websocket;
	connect();
	function connect(){
// 		websocket = new WebSocket("ws://본인 아이 피주소/www/chat-ws");
		websocket = new WebSocket("ws://localhost/www/chat-ws");
			//웹 소켓에 이벤트가 발생했을 때 호출될 함수 등록
			websocket.onopen = onOpen;
			websocket.onmessage = onMessage;
	}

	// ##### 연결 되었습니다!
	function onOpen(){
		id = document.getElementById("id").value;
		websocket.send(id + "님 입장하셨습니다.");
	}

	// ##### 메세지 보내기 버튼 클릭!
	document.getElementById("send").addEventListener("click", function() {
		send();
	});

	function send(){
		id = document.getElementById("id").value;
		msg = document.getElementById("message").value;
		websocket.send(id + ":"+ msg);
		document.getElementById("message").value = "";
	}

	function onMessage(evt){
		data= evt.data;
		chatarea = document.getElementById("chatarea");
		chatarea.innerHTML = chatarea.innerHTML + "<br/>" + data
	}

	// ##### 연결을 해제합니다!
	document.getElementById("exit").addEventListener("click", function() {
		disconnect();
	});

	function disconnect(){
		id = document.getElementById("id").value;
		websocket.send(id+"님이 퇴장하셨습니다");
		websocket.close();
	}

	</script>

</html>
// websocket = new WebSocket("ws://본인 아이피 주소/www/chat-ws");
websocket = new WebSocket("ws://localhost/www/chat-ws")
여기서 localhost로 하면... 본인 컴퓨터에서는 잘 접속 될텐데
외부에서 접속이 안되더라 ( 나의 경우 같은 공유기 내에서 휴대폰으로 테스트를 해보고 싶었다 )
그래서 그냥 내 아이피 주소 넣고, 접속하니까 되더라.
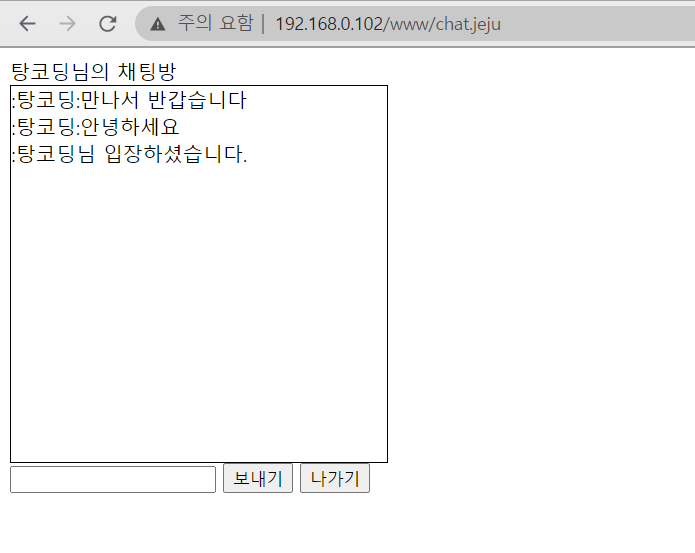

이름을 똑같이 해놔서 혼자 얘기한 것 같지만.. 실시간으로 채팅했다.
잘 작동된당!! 히히🌸
참고로 본인 아이피 보는 법 ]
cmd창 띄우고 ipconfig를 입력하면 확인할 수 있다.
'Spring > Spring' 카테고리의 다른 글
| spring-boot View 환경 설정 (0) | 2021.04.15 |
|---|---|
| spring-boot 프로젝트 생성 (0) | 2021.04.14 |
| 스프링과 싱글톤(Singleton) (0) | 2021.01.10 |
| Gradle(그레이들) 설치하기 (0) | 2021.01.10 |
| 메이븐(Maven)과 그레이들(gradle) (0) | 2021.01.08 |


